Table des matières
Documents
 A1 proofreading not yet effective for this page. In the meantime, you can ask any questions on the forum.
You can attach any type of document to any contact: files from spreadsheets or word processors, pdf files, images, sound or video files, etc.
Gestan stores these files in the “classic” way, that is to say as files in their native formats. They are stored in an individual directory for each contact, of the form: root_rep\DOCUMENTS\CONTACT_XXXX, in which root_rep is the root directory of Gestan, and XXXX is the unique identifier of the contact.
When deleting a document with a linked file, the linked file is copied to the root_dir\DOCUMENTS\TRASH directory. This is a mechanism similar to the Windows Recycle Bin, to avoid permanently avoiding important files by mistake. You can delete them at regular intervals.
Some documents are generated automatically: for example, when you use Gestan to automatically generate a letter for a contact, the mail is generated in rtf or word form (depending on the Gestan options you have chosen), the corresponding file is stored in the Gestan directory of the contact, and a Document record is stored in the database, with the document references.
 Documents are not managed in the case of a WAN option Client/Server connection.
List of documents
**Access: ** Contacts → Documents
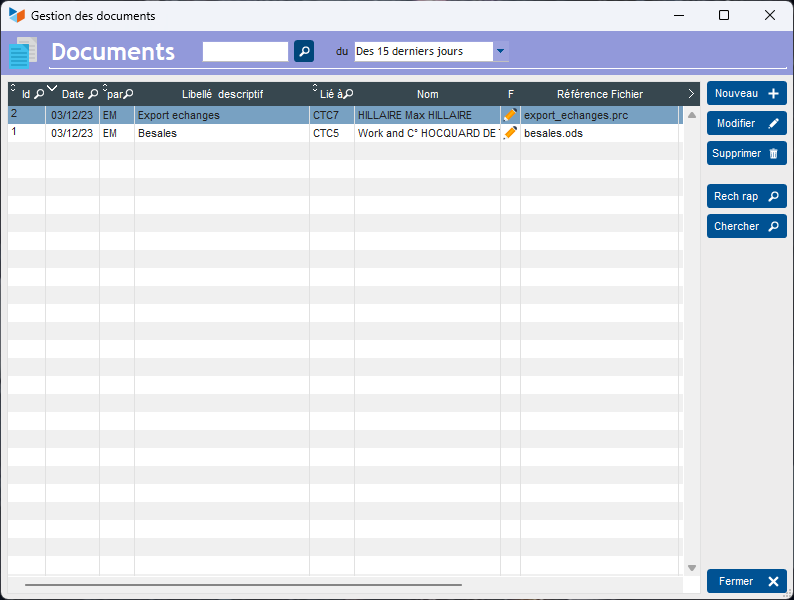
A double-click on the pencil will open the file associated with the document, launching the application associated with the extension on the workstation.
Document sheet
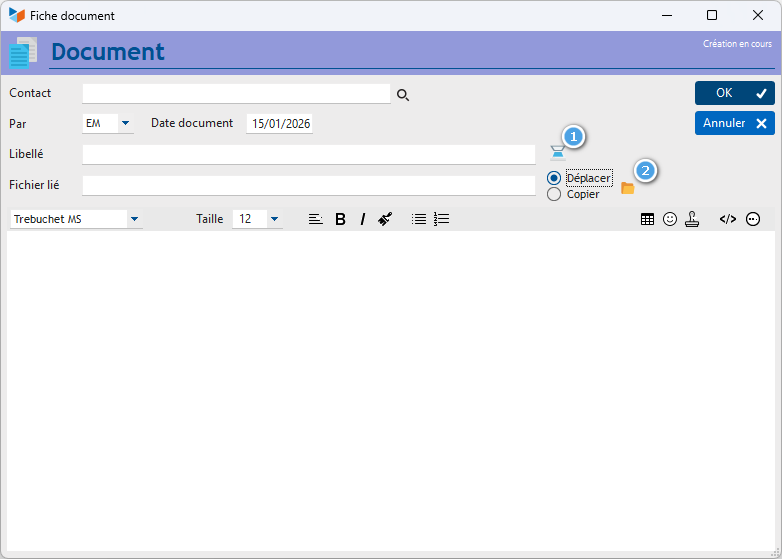
The 1 button allows you to trigger the scanning of a document, if a scanner is connected to your computer.
The 2 button allows you to select a file, which will either be copied or moved from the location in which it is located to the location managed by Gestan.
Scan a document
If a Twain device is available on your computer, the 1 button opens the screen below.
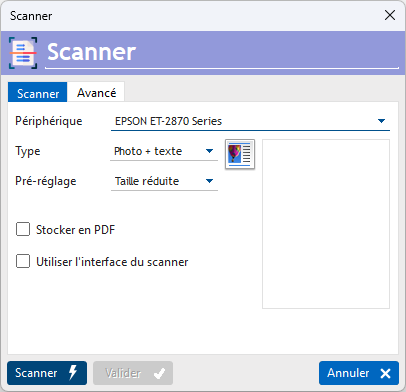
The screen lists the devices available for scanning, which are those that support the TWAIN protocol, through which Gestan communicates.
The Document type and Pre-setting combos determine valid standard settings depending on the initial document type and the purpose of the scan. Settings can be changed individually by clicking the Advanced button.
Pre-setting: “optimal” will suit most situations, “reduced size” is suitable for those looking to use as little space as possible on the hard drive.
If the Store as PDF box is checked, the image will be embedded in a PDF, which is a good option if you have to transmit it.
If the *Use scanner interface* box is checked, Gestan will open the scanner interface to do the scan. Please note, in this mode, scanning through the scanner interface is limited to 24 bits/pixel for color images, and 8 bits/pixels for others.
The *Scan* button starts the scan, the result is displayed in the right field. If it suits you, click on validate, or if not, modify the settings you want, and click on Scanner again.
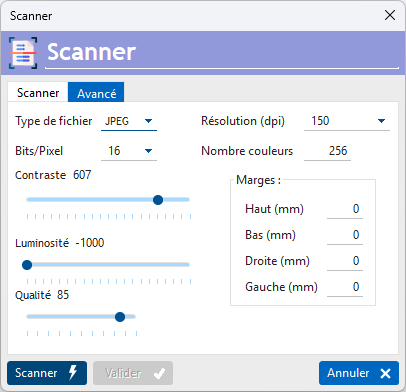
Advanced settings allow you to modify standard settings.
These settings determine the final rendering of the scanned image, but the higher the quality, the greater the size of the file, which therefore takes up space on the disk. These settings allow you to optimize the size/readability ratio.
The file type allows you to select the coding mode that takes up the least volume: prefer GIF files when you have few different colors (for example, black and white text or with a simple logo, colored images with solid areas), and JPEG files when you have many different colors (case of photographs, for example)
In most cases, a resolution of 150 dpi is a good balance between scan size and readability.
 Other Contact articles